I Feel So NOT Violated- Thank You, Policies ;-)
Ever wondered how those crafty IT support admins lock you out of all that you know Windows can offer you? All of the fun stuff! Well, this blog will walk you through the basics so you can apply the same maniacal tactics to your home system, or take this back to your office.

What kind of policies exists in Windows? There are two types of policies that can be modified by an administrator.
Local Security - these are policies that impact how the system itself is structured for user interactions. (i.e. a user, not an administrator, can be restricted from performing an activity like shutting down the computer)
Group - These policies look at how to restrict the users versus how the system responds to users.
If you are thinking about Active Directory, yes Group policies are applied in AD, but we have not gotten there yet. We will cover AD in future posts.
Setting up a Local Security Policy
Log into your windows machine, and open Local Security Policy Manager by searching for it in the Start menu or by navigating to it from the Administrative tools window.
Note: Local Security PolicyHome edition of windows does not allow access to any of the administrative tools.

Under "Local Policies", you will find the folder "User Rights Assignment". Here we will modify how power cycling can be managed at a granular level. There may be times when a machine should not be restarted or powered off(e.g. If you are running an IIS webserver to host a webpage or website). The admin would want to restrict which user can power cycle the machine, and this is where you do that.
Find the entry labeled "Shut down the system"


It does not take much to realize "Everyone" that everyone should not be here. Click on the group "Everyone" and then click the button "Remove".
Double click with the left mouse button to open options for this setting. From here you will add any users that you trust to power cycle your machine, and remove those who should not be given this right.
It does not take much to realize "Everyone" that everyone should not be here. Click on the group "Everyone" and then click the button "Remove".

Click the "Apply" button to save the changes, and then "Ok" to exit.

While signed in as an administrator, you will notice that when the power button is clicked, our normal options to restart or shutdown appear.

If you sign in as a non-admin user, the power button will display the following: "There are currently no power options available"

So cool fact, everything that we do in Windows is captured somewhere, and for policy changes that would be somewhere in the registry. I will have another post on how to track down these types of changes.
Group Policy
In this part, we will set up a group policy to block a non-admin user from accessing the task manager. The Task Manager is a powerful utility that allows the user to not only stop running processes but the user can also modify the start-up services and applications. This is something any local administrator should consider in order to secure their computer resource.
Open the Group Policy Manager, by searching for "group policy" in the start menu.

The policy that you are looking for is located under the "Crtl+Alt+Del Options" folder. The folder structure is "User Configuration" -> "System" -> "Ctrl+Alt+Del Options".

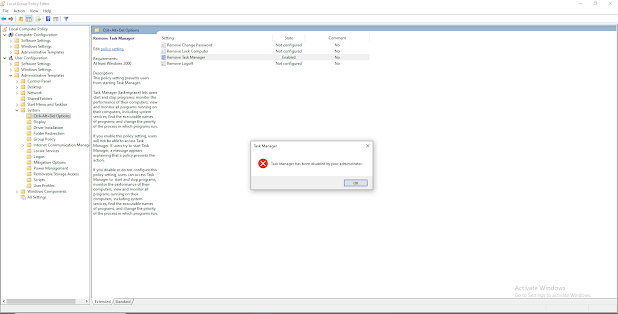
Double click the option "Remove Task Manager". This will open the pop-up to enable the policy.

Click "Apply" and then "Ok" to close.

Now that the policy is enabled, try and open the Task Manager.
Press "Ctrl+Alt+Del"

Or search in the Start Menu

Even as an administrator you should receive an error meaning that the Task Manager is not available.
But WAIT! This is not what you intended. You intended on having access to Task Manager while all non-admin users were restricted. Well, this is where understanding the registry comes into play. Every change that we do to the system is stored somewhere in the registry, you just have to know where. Let's try and fix this by making changes in the registry directly.

Remember that the registry is made up of hives. Because your change was intended for specific users, you will focus on the HKey Users hive. Expand the hive, and select the appropriate SID for your admin user. HINT: the last 4 digits of the SID are unique for each user, and they increment starting from 1001. Recall the order in which users were created, and take your best guess as to which one is yours. OR you can run the command whoami /user from any cmd prompt.
Note: SID' s are unique identifiers assigned to every user on a Windows system. The more users signed in, the SID's will be visible. SID's are only visible under HKey Users if they are actively signed in to the system. Your SID will be unique to your system but follows the same structure. To learn more about SID's check out this article: https://docs.microsoft.com/en-us/windows/security/identity-protection/access-control/security-identifiers

From your SID navigate to the following folder (known as a key in registry) Software -> Microsoft -> Windows -> Currentversion -> Policies -> System

At this point you can do 1 of 2 things:
- Change the value of the for "DisableTaskMgr" to 0
- Delete/remove the Key "System"
I personally like option 2
Option 1)

Option 2)


Now you will notice that your profile has had the Task Manager reenabled.


There you have it. You now know how to set up system-wide policies to better secure your system. As always, Google is your friend, and curiosity and exploration will make it stick. Have fun and trust the Technoproof.

Comments
Post a Comment